It's meant to let someone carry a ball of yarn or some handspinning fiber hanging from the wrist - excellent for portable projects! It's about five inches tall and five inches deep.
Techniques you need to know include - Knit, purl, slip, yarn-overs and decreases - Provisional cast-on - Knitting in the round - Three-needle bind-off - I-cord - Kitchener stitch (a tiny amount)
I've added some free PDFs on the sidebar and will probably add some more over time. These are my write-ups of some of my favorite techniques, ones that I don't see in common use.
Lifted increases look similar to regular decreases. Both left and right lifted increases are possible, mirroring left-leaning and right-leaning decreases.
The disappearing loop cast-on is useful for starting any knitting you work from the center outward, like doilies, some shawls, and hats or mittens knit from the top down.
Links go to Google Docs; the PDFs look better in a different viewer.
This was an exercise in making lemonade from lemons!
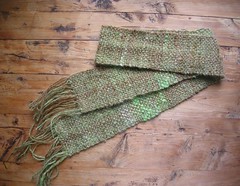
I had some grey Coopworth combed top, which I handpainted. Unfortunately, I was (and am) still pretty new to dyeing, and the fiber got somewhat felted.
So I pulled it apart into color chunks, and combed the different sections to produce a very little bit of combed top which was lovely to spin up into a small quantity of semi-worsted 3-ply using a spindle.
Because the fiber had been felted, there was a lot of combing waste. I needed something to practice wheel spinning with (because I had some fiber I wanted to spin on a wheel for the Tour de Fleece), so I drum carded the waste, knowing full well that I'd end up with lumpy-bumpy thick and thin yarn. Which I did, and then I plied it with some very thin bouclé that my friend had. I liked it, but it was bulkier than I usually like to use, and besides, it wasn't really quite my style.
So I decided that the two yarns put together would make a project, and bethought myself of using a backstrap loom for the purpose. Now, I've put together another backstrap, but haven't finished the project. Also, it's been over 20 years since I did any serious weaving.
I am therefore pretty damn pleased with the result! It's a fairly consistent width and the selvedges are not too blobby.
I originally posted a different version of this on the Advanced Knitting community on Livejournal. I hope I have learned from my mistakes; I certainly appreciate the commenters over there for making me reformulate my thoughts on the subject!
----
Sometime in my teens, I learned this cast-on, which has remained my favorite. I might have learned it from my grandmother; I can't remember, and my grandmother's memory is unreliable at best at this point, so I'll never know for sure. I'm a little sad about this, but so be it.
I didn't know a name for it until recently, when I checked Nancy Bush's Folk Socks out of the library. It was the first place I had ever seen it described. Armed with a name, I searched on Google, and found only two sets of instructions for it, both text. Here's the links, just in case they help clarify the instructions I'm providing: Britt Scharringhausen, Lord Gazmuth.
But there's no illustrated instructions online that I can find, and I'd like to show other people how to do it, as I think this cast-on has a number of advantages:
It's quite stretchy. (I can usually use it for sock cuffs.)
Because it's knit onto the needle, you can cast on in pattern. I only show casting on with knit stitch here, but you can also knit and purl (handy when you're about to do ribbing), and I imagine you could do the first row of a lace pattern with it.
I think it's attractive.
At the end of casting on, you'll have completed your first row of knitting.
There are some potential disadvantages:
If you aren't comfortable with throwing the yarn around the needle with your right hand when knitting, this isn't for you. (So if you're exclusively a Continental-style knitter, this won't be comfortable.)
You need to remember that you've completed your first row of knitting after casting on. Note: for some stitch patterns, if knit in the round, you may want to purl your cast-on instead of knitting.
If you are using the tail as a marker for something, it might be at the opposite end from where you're used to.
As with the more usual long-tail cast on, you'll need to allow enough tail for the cast on (or else use a separate length of yarn, in which case you'll need to weave in extra ends).
This is a long tail cast on. It's not the usual method that's called "long tail" by default. There's an extra twist in each of the loops created by the tail. The result is identical to the Twisted German cast-on; it's a different method for arriving at the same result.
First, figure out how you're going to do the tail. I've seen suggestions for the long-tail cast on of leaving a tail that's four times the width of your first row of knitting. I've also seen the suggestion of 1" per stitch in thicker yarn (worsted) and 1/2" per stitch for things like lace weight. Alternately, you can leave about a yard of tail, cast on 20 stitches, mark the ends of the tail yarn used in the cast on, unravel it, and figure out how much yarn you used per stitch. Also leave some extra for weaving in once you're done knitting. Or you can use a separate length of yarn* from another ball of the same yarn, a contrast color, or the other end of a center-pull ball.
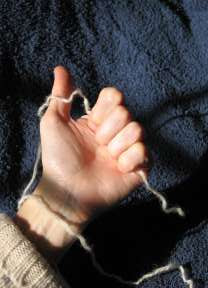
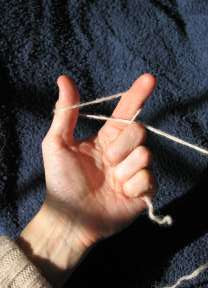
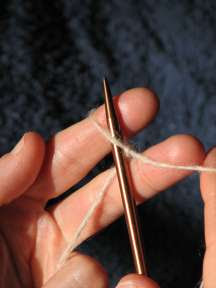
First, lay the yarn over your palm so that the tail end is trailing off the pinky side of your palm (it's usually much longer than I show here; I'm just trying to make it clear which end is which) and the ball end is lying over the base of your thumb.
Close your fingers over the yarn. (I usually leave my index finger pointing up, contrary to this picture, but it doesn't really matter.)
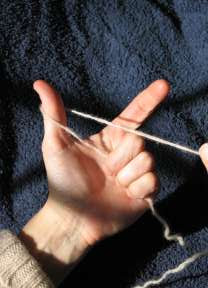
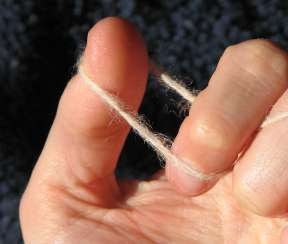
Loop the ball end of the yarn around the tip of your thumb so that the ball yarn is between your index finger and the tail yarn.
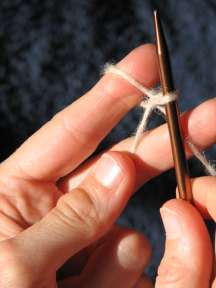
With your index finger, reach over the ball yarn and under the tail yarn.
Here's another, closer view.
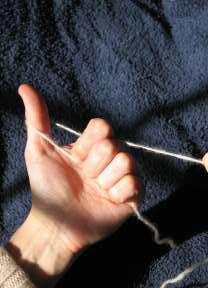
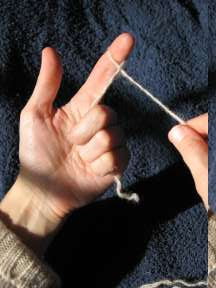
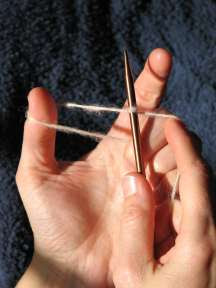
Straighten your index finger.
Drop the yarn off your thumb and pull the loop tight around your index fingertip. You now have what is essentially a twisted backward loop on your index finger. I kind of think of my finger as a flexible knitting needle when I do this cast on.
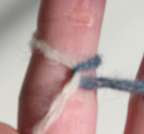
I did a little fiddling with two yarns so that you can see the structure of the loop more clearly.
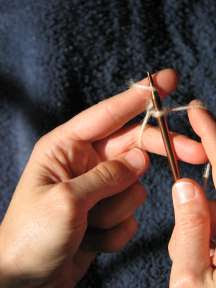
Pick up your knitting needle, put it knitwise through the loop on your finger, and knit the stitch off your finger, tugging gently on the tail yarn to pull the stitch snug. (Note that the first stitch is a slip knot, so if you'd rather do that as the beginning of your cast-on, you can. Also, you can insert the needle purlwise if you want to cast on a purl stitch.)
Now repeat the procedure. I generally keep the tail yarn held beneath the fingers of my left hand as I cast on. You need to be careful to put the correct yarn under those fingers if you put everything down to do something else.
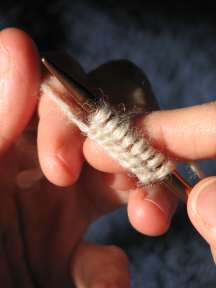
Here's several stitches on the needle, after I stopped casting on.
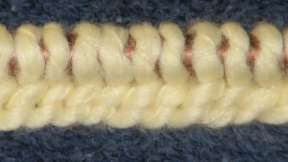
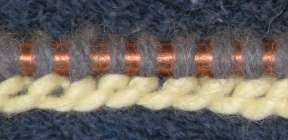
I realized that the fuzzy yarn makes it hard to see the structure of the cast on, so here's a couple more views with different yarn:
The tail yarn part of the cast on is a series of backward loops twisted an extra time. They lean to one side (from bottom left to top right).
Here's a video:
*If you want to use a separate strand of yarn instead of a tail, make a slip knot in the end of it and put it on your needle. Don't count it as a stitch. Cast on the number of stitches you want. When you can, drop the slip knot instead of knitting it.
Somehow I ended up starting a new group on Ravelry: Textile Texts, for discussions, reviews, and lists of books having to do with the technical aspects or history of textiles.
So far we've just started up by setting up topics for book lists, but we'll also be discussing a book a month (like a book club) and I hope people will post reviews of random books or journal articles as they find them.
If it gets off the ground, I think it's going to be pretty nifty. Not to mention geeky.
And it's led to me finding this nifty website: On-Line Digital Archive of Documents on Weaving and Related Topics ...just going there to get the link got me started browsing. What a resource it is! Most of the texts are not in copyright anymore; some of them have been posted by permission of the author or the publisher. Amazing stuff.
T just turned five. We'd done some minor weaving stuff together (and a bit of spinning and knitting) before, so I got him a pot holder loom made by Harrisville Designs (our local toy shop carried it). In one day, we have finished one potholder and done all the weaving on the second (we still need to finish the edges). There's two loops left over, so we clearly need to get more--in bulk. He doesn't want to weave by himself, but he clearly understands the over-under-over-under aspect and the process for finishing the edge.
Also, my Spin Off magazine arrived today, and he insisted on sitting on my lap while I browsed through to see what was in it. At one point he asked me to go back several pages so he could "look at the cute drum carder again".
I spent a while yesterday taking Persephone apart. T got to help take some of the screws out after some of the trickier bits got done. (That is, things weren't in imminent danger of falling on him.) All the small bits (screws, pulleys, still-functional cords) went into a bin, and everything else got stacked in the library.
After T went to bed, I started wiping the boards down with diluted Murphy's Oil Soap. I got about a third done. I rinsed them with a damp rag, and then dried with a soft cloth. We clamped the piece with the worst crack in it in hopes of keeping the crack from getting worse before I get a chance to glue it--after all, the worst damage to the loom was water damage.
I expect to finish washing the wood bits today. While the boards are drying I'm going to dig out our sandpaper (I'm looking for 100 and 150 grits, at S's recommendation) and see if I can find our sanding block. I am seriously wondering how much time the previous owner spent on the sanding the manual recommends. I don't mean to impugn her. Well, I do a little, I suppose. After all, Persephone did get left upside down on a dirt floor!
I have some plans for some detail work which I hope work out. It's nice to have S around as a resource: his grandfather was a professional carpenter, and S spent a lot of time hanging out in his workshop.
I'm glad that I've gotten moving on this project. The way I work, I need to get the refinishing done as soon as possible or else it won't happen for another five or ten years. And if I'm not going to do it, then someone else should get the loom. No sense having her go to waste.
I also spent a little time yesterday staring at some crochet edging that was passed down in my family to figure out how it was made. It's one of the nice kind that doesn't require a horribly long chain for a foundation. You start at one end and keep repeating the whole pattern until it's the length you want.
In the process, I might have come up with a crocheted scarf pattern based on the edging. Which, really! I need to jot a few notes and finish the patterns I'm supposed to be writing.